
This is what it was all about. But what else was happening?
Friday, May 23, 2008
Two Methods in One.
It also occurred to me yesterday that if you wanted to solve all the edges first, then all the corners, you could do so using only the techniques given in my Layers Method. After getting 4 edges on one side, hold the cube so that side is the bottom. Now get all the middle layer edges. Now use steps 5 and 6 to get the top layer edges. At this point all of the edges are home, and only corners that happened to fall into place along the way. Step 7 can be used to solve all of the corners. Use it to put one at a time into place until there are only 3 left, then use Step 7 to put all 3 of them into place at once. Sometimes you can get 2 at a time. If you use setup moves you can do all the corners without having to do Step 8. But if you haven't figured setup moves out yet and just want to use Step 7 to get the corners into place, and Step 8 to twist them, that works too. So basically my Layers Method is an Edges First Method, only if you put the bottom corners into place along with the middle edges, it takes care of half the corners so you don't have to put them into place with the Step 7 moves.
Rubik's Cube Facts
It dawned on me yesterday that there is enough info in the Facts section to enable a person to solve the cube without step by step instructions. I think. So if you want to try to figure it out rather than be guided step by step through the solution, here is what you do. Start by getting 4 edges on one side. Hold the cube so the solved edges are on the bottom layer. Now get the 4 edges in the middle layer. The middle layer is the horizontal layer between the top layer and the bottom layer. Now use facts 5, 6, and 7 to solve all the rest of the cube! I am not claiming it will be easy. It may require some trial and error. You will doubtless have to go back and fix the edges on the first two layers (bottom and middle) many times until you figure it out. But in the end, when you do figure it out, what joy and satisfaction it will bring.
Or, you could scroll down to the step by step instructions and use them. I, personally, have experienced the joy and satisfaction of working through various online tutorials to solve the cube.
If you have any questions or comments and would like to write me: robertpauljr at yahoo dot com.
Or, you could scroll down to the step by step instructions and use them. I, personally, have experienced the joy and satisfaction of working through various online tutorials to solve the cube.
If you have any questions or comments and would like to write me: robertpauljr at yahoo dot com.
Friday, May 16, 2008
Rubik's Cube Tutorial
I am attempting to work up a tutorial for solving the Rubik's Cube. Man, this is tough! I currently use a 6-step method that is a hybrid of the various techniques I learned last year. 1. Solve the 4 edges on one side. 2. Make that side the bottom and finish the first two layers by making and placing the 4 corner-edge pairs. 3. Flip the top edges so they are all top-color up. 4. Cycle the top edges into place. 5. Cycle the top corners into place. 6. (And very rarely since I use setup moves in step 5,) Twist top corners two at a time if they are all in the right places, but not oriented correctly.
Explaining how exactly to do each of these things is extremely difficult. Especially step 2, so I am breaking down step 2 into three steps, which, when mastered, would be easy to transition to the one-step version. But it is still hard to explain. I am hoping this exercise will help me to be able to explain my method to others. I want to have a printout that others can use as they are learning.
Explaining how exactly to do each of these things is extremely difficult. Especially step 2, so I am breaking down step 2 into three steps, which, when mastered, would be easy to transition to the one-step version. But it is still hard to explain. I am hoping this exercise will help me to be able to explain my method to others. I want to have a printout that others can use as they are learning.
Tuesday, May 13, 2008
Happy Mothers Day
We went to Red Bluff, more specifically, to Grandmother's house, for Mothers Day. It was also Margaret's birthday. Twila surprised us on Sunday by unexpectedly showing up. She lives in Fort Bragg.
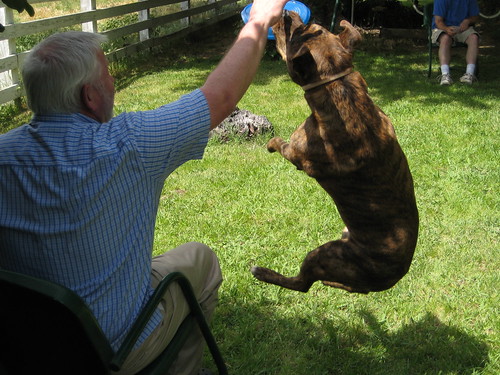 We played a little squidgie-dog in the street, but it was too hot to do it for long. I'm not used to the valley heat. So we moved the porch chairs to the shade of the lawn. We joked about the high-energy game we were playing. Robert took pictures while Rory and I played catch with the squidgie. Molly made some really nice catches, but it was a different dynamic for her too. On one of the catches she attempted she slammed into the ground on her back after catching it. And on one she crashed into me and my chair.
To view more photos from the trip, click here.
You can read descriptions of the photos where I added them. You can comment on the photos. And you can view the photos at different sizes by clicking on the photo, then clicking the All Sizes link above the photo. Then you can choose the size you want and download it to your own computer if you'd like.
Subscribe to:
Posts (Atom)